Across three months, we designed, set up and shot LED Volume days with our partners October Studios & 80Six. Our first shoot focused on creating in-vehicle driving sequences, our second shoot placed people in different environments for a US-based documentary series. In this article, we walk through our process for in-vehicle driving scenes.
Roads…? Where we’re going we don’t need roads
Many shows (of all budget levels) struggle to create compelling driving shots when the vehicle is not actually on the road. If the car is not shot on a low loader or similar, the problem ends up in the studio with a “poor man’s process”, or it’s pushed down the line to VFX in post-production.
Knowing how time-consuming the VFX process is and how long it can take to finish what is sometimes considered trivial shots, we wanted to explore how modern technology could reduce time and ultimately enhance the engagement of the scene.
Our first foray into modern virtual production was improving the “poor man’s process” for in-vehicle sequences, essentially rear-projection.
So, armed with the background content, a modest VP solution, different playback technologies and a stationary vehicle in a studio, we set out to shoot three scenarios; daytime UK city driving, night-time rural driving and night-time US city driving.
UK Daytime City Driving
In this example, we used two display devices, one behind the car and one above. The background plates (BG) were captured with a modern cine camera array, consisting of three cameras – Right, Left, Up and clocked for Front, Back, Up.
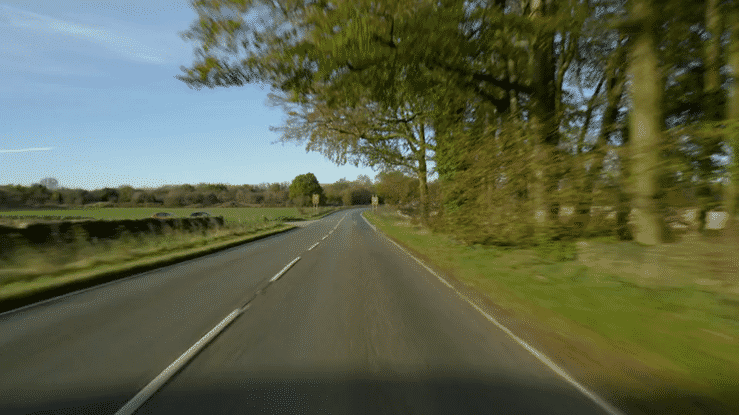
These were captured with a Brownian-built genlocked Red Weapon system and post-processed for playback onto the stage screens, allowing for some colour adjustment on the floor. We used a pure video route to the processors and had a single button start-stop, synchronised capability.
We applied a small rocking motion to the vehicle itself but all other motion was applied in post.
Considering this is a small system, the results are very encouraging. To some people, I don’t think they’d know that this car didn’t move an inch.
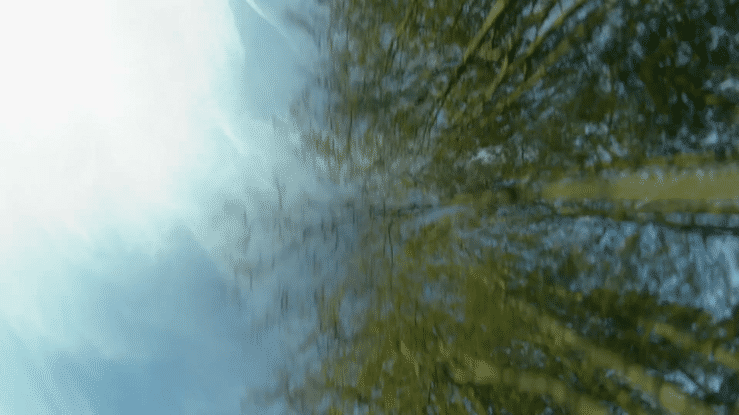
UK Night-Time Urban Driving
For the night-time in-car sequence we used the same LED set-up as the daytime sequences, but this time we tried supplying the BG plates via a different technique and system.
The original material was captured using a dual Red Weapon fish-eye system delivering a full 360° equirectangular plate (also called a LatLong plate), which looks like a sphere that’s been unwrapped.
We used the LatLong plate and projected it onto the inside of a virtual sphere where we could “re-photograph” any sections of the 360° that we needed to match the foreground shot. These virtual shots are then piped to the relevant display device.
The advantage of using this technique is that two cameras can capture a full 360°, which is less to wrangle but, slightly more post-production to produce the Latlong plate. This technique is also known as 360 interactive.
Bear in mind this example doesn’t have any camera tracking, the background is static while the principal camera moves.
We were impressed with the results straight out the tin, however, we did perform some post-production in the form of a grade and some cheeky little enhancements. The bottom line is this sequence took 1.5 hours to shoot and a few hours in post.
US Nighttime City Driving
For the final part of our test, we created an Unreal environment that we laid out to mimic a typical neon-lit downtown strip in America.
Our aim was to test the principle of using Unreal Engine to output either generated scenes or as a way to playback photogrammetry assets, or even 2D plates.

The neon city asset was fairly basic. We used scene assets that were immediately available to us. There wasn’t scope on this test to build anything bespoke.
Using nDisplay and two machines for playback we managed to feed two devices with the correct source imagery to provide the camera Frustrum and the reflection source.
Using Unreal Engine as a source does require considerable time to build the scene in the first place, and time to get it running on the stage. Time to test all the components is essential for getting a good result. We allocated one day as a “pre-light/rehearsal” day for all of our media.
Summary
We were pleased with our results and I would argue that they are more convincing than a lot of mainstream material we’ve seen. While it appears to be a simple process, and I think the majority of people believe it is simple, there are many things to think about and deploy to create a shot that is believable.
We learnt a lot, not only about how to cost, schedule and deploy the equipment that’s needed on-stage but also gleaned a lot of techniques and some tricks. We’ve performed in-vehicle shots for many shows in the past which range from single camera 35mm plates to multi-camera array shoots, which have been used in several post-production applications.
The biggest benefit of shooting it in-camera is that you walk away with results that everyone on set agrees looks good and convincing. In turn, this speeds up the editorial process and can even mitigate any need for VFX in post-production.
However, if you don’t spend the time planning what you’re going to shoot and you leave the VFX Supervisor at home, you might be left scratching your head on the day.
This project was supported by a grant from the New Anglia Growth Through Innovation Fund, which is part-funded by the European Regional Development Fund.
Lexhag has a background in traditional in-camera effects and has integrated with Art Departments over the years; virtual production seems like the perfect synergy for our heritage and skilled artists. You can see our recent results here.